
How to Chink Your Log Cabin – Techniques, Materials and Cost
When it comes to building, purchasing or maintaining a log cabin, you can’t go far without discussing log cabin chinking.
Chinking is the material that fits between the imperfect joints of logs to ensure a “seal” from external elements (e.g. rain, snow and sleet) whilst eliminating heat loss and air infiltration.
In simple terms, chinking is the flexible sealant used during your log home’s construction or maintenance to seal joins between the logs, gaps, holes and checking.
Log Home Chinking today has replaced the traditional portland cement and daubing which historically was used on log homes over 200 years old.
Since the origin of log cabins, chinking has long been a hallmark of these beautiful homes.
However, log cabin chinking today can be a complicated topic:
- Should you use cement based or synthetic chinking?
- How much does log cabin chinking cost?
- How can you make your own chinking (what’s the best chinking recipe)?
- What are the techniques and methods to apply chinking to a log home?
- What is caulking and is this different from chinking?
So, continue reading as we simplify log cabin chinking and answer all of your questions…
Why Do We Need Chinking?

We need chinking for our log cabin to:
- Create a “seal” from external elements (e.g. rain, snow and sleet) whilst protecting the logs from pooling/standing water which could result in rotten logs.
- Eliminating heat loss and air infiltration to maximize your cabin’s energy rating by correctly insulating the cabin.
- Prevent against bug and insect infestation through tiny gaps in your log cabin’s wall.
Logs aren’t perfect.
Logs can twist, kink, cup and bow.
Changes in the environment, humidity, sun and shade exposure and geographic differences can cause logs to move as their moisture content changes.
Logs also have an uneven nature and structure.
Consequently, it’s near impossible to build a log cabin with logs that notch perfectly together without any gaps.
A build like this, would also be a bad thing.
As your log home settles and the logs expand and contract (due to the factors above), if there wasn’t a gap for the logs to move into it would cause further twisting and bowing of logs.
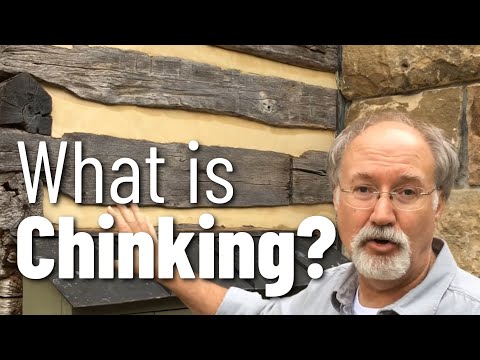
What is Chinking?

In short, chinking is the material which is placed between the logs of a log home.
Chinking is to logs as mortar is to bricks.
Chinking is a flexible material used to fill gaps where logs don’t meet completely. Essentially, chinking a log home will ensure logs which don’t fit together perfectly have a nice seal.
This “nice seal” is the best maintenance free form of protection again moisture and air infiltration, insulation and fire barriers for your log home.
Not all log cabins require chinking. Why?
It depends upon the notch used.
If the cabin has an air-tight notch (e.g Scandinavian Chinkless) it won’t require chinking.
All other forms of cabin notches will (e.g. dovetail, corner and butt and pass).

What Material is Chinking Made From?
Today, log home chinking refers to a flexible elastic sealant that resembles the appearance of the old portland cement which historically was used to seal logs together.
Prior to cement-based chinking; traditional chinking was made from a mixture of clay, sand, lime, silt, ash and dirt.
The inner layer was traditionally known as “daubing” and the out-layer more commonly known as “chinking”.
Chinking in summary should allow your cabin’s logs to breathe whilst also protecting your cabin from the external elements discussed earlier.
Types of Log Home Chinking
Today, we have two main schools of thought for chinking materials:
- Mortar Chinking
- Synthetic Chinking

Mortar chinking continues the traditional approach of chinking log homes and is mainly used for do-it-yourself log cabins (i.e. cabins built from scratch).
Synthetic chinking is made from either acrylic or petrochemical elastic compounds which have the ability to expand and contract with your logs.
Synthetic chinking is commonly water based, however, a few are oil based.
So, what are the major differences?
PRICE
Typically mortar chinking is 10% of the price of synthetic chinking. We will discuss this more in the price section later.
From experience, log cabin kits use synthetic chinking and self-build cabin owners use mortar chinking.
Whichever chinking you decide upon, it must have good elastic properties.
Understanding that your cabin will settle and planning for it with flexible chinking is important.
Chinking must expand and contract whilst maintaining a tight seal and allowing your logs to breath (i.e. not trapping moisture).
So, Mortar Chinking or Synthetic Chinking?
It depends.
If you are building from a log cabin kit home you probably will use synthetic chinking as the logs will need to settle in their new climate and environment.
If you are building a cabin from scratch then you will probably use a self-made mortar chinking; providing the logs have been felled locally and have properly dried out.
This is not a strict rule.
In reality when building your log cabin, you can choose from either material.
However, from experience, self-builders will use mortar to give a more authentic finish and save on cost.
What’s the Difference Between Caulking and Chinking?
You might have heard of the phrases caulking and chinking being used interchangeably, however there is a difference.
The main difference between caulking and chinking comes to their purpose.
Both are somewhat similar in material.
However, caulking is exclusively used for smaller logs (e.g. 6” or less in diameter) or for smaller gaps between logs.
Typically, if the span or depth between the logs is less than 1 inch then caulking should be used.
Caulking can also be used to fill checks (i.e. horizontal cracks) in logs too.
If the span or depth between the logs is greater than 1 inch then it’s time to use chinking.
Chinking is used on larger diameter logs too (e.g. 6” or more diameter) and is compatible with most notching techniques (e.g. traditional and dovetail).
Chinking can fill a span from 1 to 5 inches in width.
Caulking is often a smoother finish, whereas chinking is a much coarser textured finish.
How much does Log Cabin Chinking Cost?

The cost of chinking can depend upon many factors.
- Size of Chink Lines (1 inch to 5 inches)
- Square Footage of Cabin
- Height of the gable wall to the ridge
Log cabin chinking is priced upon per foot or per pail (i.e. bucket).
Pails typically come in 5 gallon sizes.
If the chink line is 1 inch in height and 1 inch in depth you should be paying $1.20 per foot of synthetic chinking and $0.15 for mortar chinking
For Example
A Cabin which is 20FT (width) x 24FT (length) x 9FT (height). Using 12” girth logs you will be stacking roughly 9 logs high.
88 linear feet (perimeter of your cabin) x 8 one inch chinking lines (number of logs high -1) is 704 linear feet.
This is multiplied by two as you chink inside and outside.
The total is then 1,408 linear feet of chinking.
If you were to chink the cabin using synthetic chinking the cost of chinking would be $1,689.60.
If you were to chink the cabin using mortar chinking the cost of chinking would be $211.20.
Both of these prices exclude labor and backing rods.
Backing roads are typically $0.25/foot and labor can be roughly priced at $8/foot.
Now you understand what log home chinking is and the materials it can be made of; it’s time to discuss methods and techniques for applying chinking to your log cabin.
How to Chink Your Log Cabin
Chinking a log cabin.
It appears to be a very easy task.
And it can be.
But, it can also be tedious, awkward, time-consuming and requires lots of patience!
Applying chinking to your log home yourself is entirely possible, you just need to follow basic rules and methods.
A quick tip
If you are planning on making your own chinking, then scroll down to chinking recipes.
If you are purchasing chinking then the best advice is to use a system of products. Purchase your chinking and stain from the same manufacturer as their formulas will have been tested to be compatible.
Now you are ready to chink.
Applying Chinking

When it comes to chinking, getting comfortable with your tools, is a must.
Once you get comfortable with using your tools ; quality and speed will come too.
Applying the chinking involves four stages:
- Log Preparation
- Backer Rods Installation
- Application of Chinking
- Clean-up!
Top-tip
Before you have chinked your cabin; you will need to decide upon the stain you are using (if any).
A basic rule of thumb:
- If you are using an oil-based stain then chink first and stain to complete.
- If you are using a water-based stain then stain first and chink to complete.
The first stage for chinking is to prepare your logs.
Your logs must be free of surface level dirt. This includes pollen, mildew, dust, oil, wax and sawdust. Read here for more guidance on cleaning logs.
Once clean, the logs should be from 40°F (4°C) – 80°F (26°C).
This ensures the logs’ surface is not too hot to evaporate the water in the chinking or too cold. If the logs are too cold the pores tighten and prevent the chinking from adhering.
The second stage to chinking is to apply a backer-rod.
A backer-rod, or homemade substitute, provides a “bond breaker” which provides a surface the chinking won’t adhere to.
A backer-rod allows the chinking to only adhere to 2 surfaces (i.e. the top and bottom log) providing more elasticity and movement in 2 dimensions as opposed to 3.
In simple English, the chinking will move freely along a vertical axis with the logs.
A backer-rod is typically a synthetic foam which is inserted between the cavity in the logs. A foam backer-rod is typically a grip strip.
A homemade backer-rod can be made from clear tape or typical fibreglass cut into one-inch strips.

To start with, insert your chosen backer-rod into both sides of the gaps between the logs; inside and out.
After lightly pushing the backer-rods in, make sure there is an air pocket between the two pieces of backer-rods.
If you are using a mortar chinking, you will need to install chinking nails.
Chinking nails should be galvanised nails angled into the lower log every 2-3 inches on your cabin. This will hold the mortar in place whilst curing. Bend the nails up towards the top log once nailed into the lower log.
All the preparation is complete. Time to apply the chinking.
Methods for applying chinking
There are the four main methods for applying chinking.
- Trowel
- Grout bag with a nozzle
- Chinking gun (bulk loader)
- Chinking pump
Not one of the four methods are better than any of the others.
When purchasing chinking it comes in either 5-gallon pails or chinking guns.
If your chinking is homemade then you will probably use a grout bag or trowel.
Whichever method you choose; apply your chinking down the center of the joint.
Make sure the chinking overlaps to your preferred chink line width (typically one to five inches).
Start by running smaller bead lengths. You should aim to cover 10 linear feet per hour. My suggestion would be smaller 1FT bead lengths for your chinking.
Typically, a chinking gun is used with a 2-inch nozzle. The gun can be used in combination with a foam brush.
Once the chinking has been applied, take the foam brush and flatten the chinking’s surface.
Some quick tips from experience:
- Only chink in smaller 10-minute sections
- Chink lines should be 1/7 of your log’s diameter
- Good contact with upper and lower logs is essential for adhesion
- Aim to cover 10 linear feet per hour
- Chinking depth should be ½ inch
- Allow good time for curing
Finally, clean the logs!
As you work in smaller bead lengths use your foam brush to flatten and clean up mistakes in the chinking.
If you are using a 2-inch nozzle use a 1.5-inch brush.
Keep the brush clean and work it whilst the chinking is moist to keep the edges clean as you go.
Correct your errors as you make them!
Log Cabin Chinking Repair and Maintenance
Chinking should last for between 20-30 years, providing it has been applied using a correct technique with backing rods.
The only way this can accelerate is if the cabin has experienced hot temperatures or lots of exposure to rain.
When we speak of chinking repair, typically we are referring to older cement paste chinking, as most modem synthetic chinking isn’t 30 years old.
The most common form of chinking maintenance is for sealing smaller gaps, splits or cracks in the logs.
These defects are known in the industry as “checking”.
Rule of Thumb
Any check over 2 inches should be filled; regardless of whether it’s a vertical or horizontal check.
To read more about maintenance of chinking, you can read here.
For a typical log cabin, you shouldn’t expect to chink more than 4 gallons per year which will cost roughly $200 for synthetic chinking.
If when repairing your cabin’s chinking, you aren’t looking at checking, what you are probably seeing is failing chinking.
If your chinking has failed. It’s sometimes best to start again.
If only smaller sections have failed, cover the chinking with clear tape and chink a fresh layer of chinking over the top.
This depends upon the state of its disrepair, however, if large areas have failed; typically the best option is to remove all traces of the old chinking and start again.
How to make your own chinking – Log Cabin Chinking Recipes

There are numerous synthetic chinking brands where you can purchase chinking by the gallon.
Creating your own chinking can complete a self-build project perfectly.
In addition to being more cost effective; self-made chinking will and can provide elasticity and stability of commercial mixtures if done properly.
You will need to ensure your chinking mix is porous enabling your logs to breathe properly.
There is an argument that portland cement can be too hard.
However, some of the successful recipes below use portland cement. Go figure!
| Mixture per batch | Materials Used |
|---|---|
| 1 part clay 1 part coarse sand 1 part lime |
Clay, Sand and Lime |
| 1 part pre-dyed cement 1 part fine sand |
Cement and Sand |
| 2 part portland cement 1 part oakum 1 part grass |
Cement, Oakum and Grass |
| 1 part lime 2 part portland cement 3 part masonry sand |
Cement, Sand and Lime |
| 1 part portland cement 3 part coarse sand |
Cement and Sand |
| 4 part clay 2 part wood ashes 1 part salt |
Clay, Ash and Salt |
| 6 part sand 2 part portland cement 1 part lime |
Cement, Sand and Lime |
Make sure you use the same materials though-out your batches.
Stick with the same materials and be consistent with your mixes.
A good rule of thumb
When adding water to cure your cement, the texture should resemble creamy peanut butter.
So, to conclude this article on chinking.
What does bad chinking look like?!

Have you ever chinked a cabin yourself? Are you planning on chinking a cabin? Do you have any questions on chinking a cabin? Get in touch. We would love to hear from you!

We are building a cabin 16×16 with square sawn white ash logs (emerald ash borer) 6×8 w 2″ space
what recipe would be best
Hi Jim,
It’s a good idea to test a few different recipes. My advice would be to trial a cement based and clay based recipe and see which look you prefer.
Thanks,
Dave.
What brands of chinking are oil based? Which has worked the best for you? Also, oil based caulking brands for log homes. Our 30 year log home was recently blasted, sanded, and stained with Twp. The original Perma check chinking is still in place. I’m looking toward the future with maintaining my home with an oil based stain. Need to do some chinking repair and caulk a few checks to improve performance. Thanks!
Hi Meg,
Take a look at NatureColor, WeatherSeal, or WR-5 brands.
Hope this helps!
Building a tool shed with an exterior of landscape post to resemble a log cabin what material would you use for the chinking? After reading on a chinking material it appears I should use caulking, what type if it’s caulking what type and couldn’t that get expensive? Thanks
Hi Steven, Are you looking to purchase your own chinking or make it? My answer will depend upon which technique you will use.
I am reconditioning a 30+ yo cabin. The exterior is greyed from weather and neglected. The logs are ok but basically bare and smooth. Can I stain over the logs without sanding?
Hi Dave, after that amount of time, I would suggest a quick sanding before re-staining – take a look here http://logcabinhub.com/log-cabin-maintenance-costs/
I need to know how to fix a log that is partly rotten!
Hi Robert,
Please read this article here http://logcabinhub.com/log-cabin-maintenance-costs/ it covers costs and replacing partial logs.
Hope this helps,
Chinking a 175 year old log cabin. I want to use portland and sand. Some gaps are 5 or 6 inches while some are less than an inch. Should I use 1 part sand and 1 part portland? Also, I’d like to make it more beige than gray. What should I color it with? Thanks!
I bought a 60-year-old log cabin. I have rebuilt cabins made by the same man. As I remember we used an equal mix 4 to 4 to 4 of cement sand and lime. I need to patch mine and trying to figure out how to match my color best without making batch after batch after batch. Is there a color guide to your mix chart? All help will be appreciated greatly! Thank you
Has anyone used any of those premixed mortar mixes (Sakrete, Quikrete, etc.)? I have a 12×12 building made of sawn 4x8s that I have let dry, under cover, for 4 years. The building is up, and I will chink it in the spring (2020). The gaps between logs varies from 5/8″ to 1″. Thanks.
Howdy to y’alls at the Log Cabin Hub.
The information I have read is quite informative for what I need to be doing to rechink this log home I find myself enjoying in my latter years of my life.
Even though the information is quite informative it would be great to get some more information on this task of re-chinking. My intention is to keep intouch with you at the HUB to be sure I get more than enough information to perform this task.
Hoping to hear from the Hub in the near future.
Sincerely interested in chinking this log cabin:
Gordon
Hi Gordon, thanks for your message. Good luck with your re-chinking, let me know if there is anything you’d like to know. Best of luck!
Hello,
I bought a log home a little over a year ago. There is a gap from the floor installation to the first log on the wall. It is about a 3-4 inch gap and it happens on tile floor and carpet. I believe this is where I have bugs coming in. Do I need to put in backer and chink this area? Thank you for your help.
Hi Kelsey, this is a very large gap from the floor to the first log. Was the cabin bought and designed to be like that? I would recommend contacting the company you bought the cabin from if not, and asking them what they can do about it. I hope that helps!
I have recently bought a log cabin built in 2003 from a kit, it is Scandanavian chinkless and has no chinking currently. It is in New Mexico (very dry) and the cabin is showing gaps, and cracks. I also like the look of the thin chinking lines on the interior. Am I okay using a homemade mortar or do I need to use the synthetic one for this application.
Thanks for your help
Barb
Hi Barb, thanks for your message. You can use your own recipe, but you’ll need to make sure that the recipe creates a flexible mortar. Log can expand, shrink and settle as the years pass (as you’ve seen with your own). The best option is to buy a premade chinking solutions such as Permachink. I hope that helps!
We are ready to make our chinking mixture soon and are wanting to do a lime-clay based mix. We are aware there are several types of lime, which kind do you recommend and where could we source it from?
Hi Michael, Thanks for your message. Lime based chinking is a great option for log cabins, it makes the mix more sticky and less likely to crack than regular chinking options. You’ll want to use a hydrated lime, what are the different options you have so I can advise you better? Many thanks, David
We are restoring a 1932 cabin that has board walls sided, inside and out, with cedar log ends from the local mill. It looks like a log cabin. There is no insulation, and we’d like to seal it up from bugs and critters. The gaps in the logs vary greatly, and some walls even have more log faces than others.
Given the coronavirus shutdowns, we have to be very cost conscious. What advice can you give us? Any chance I could send a couple photos and we could have a quick chat?
Sincere thanks!
Hi Tracy, the cabin sounds interesting. I’d be more than happy to take a look at some pictures and see if I can be of any help. Please send them to my email, thanks, David
When should a new log home be chinked. Wait for settling? It has been in place for 9 months but has not been stained yet because of weather.
Hi Cheryl, you can chink your log home as soon as you like after it has been built. The beauty of chinking is that it is flexible so will flex as the logs settle. I’d love to see your cabin once you’re finished staining and chinking! Thanks, David
Hello there
I’m planing to chink our 100years old log cabin made of larch. It’s situated at 1450m in the swiss alps.
What kind of chink mixture would you recomend? It’s kind of harsh climate; it’s either cold and wet or hot and dry.
I thought about making chinking from out- and inside and hempfiber in between the logs…
I’ll be verry happy to hear from you!
Kind regards..
Hi Alexandre, thanks for your message. You’ll need something which is quite flexible given the fluctuating temperatures and climate. It depends whether you want to keep with the older methods to keep in line with the older cabin, in which case Oakum is a good fit. The newer synthetic chinking might be longer lasting though, Permachink is the one I usually recommend. Thanks, David
I inherited a 40 year old cabin that was built from bark on D-logs that were still a bit green. There’s some obvious water penetration. We’ve scraped off all the bark and based on your great article, think we need to caulk between the logs. Because the logs have twisted and shifted there’s no obvious place to run a caulk bead line between many of the logs that will stick. Should we try to add a small groove and if so, is there a recommended tool? Some other solution?
Hi Camille, thanks for your message. It’s difficult to advise you on this without seeing pictures. Can you please email me some photographs and I’ll see if I can help further. Thanks, David
We have moved a 110 y/o tobacco barn to our farm to use as a garden barn. Many logs weren’t usable, so we have a rock base (secured on corners w/ concrete). We primarily wanted it to give our new farm some old character. Since it will only house garden tools/implements, we aren’t concerned that it holds heat, just keeps out much of the rain/snow. We are located on the NC/VA border. Interested in chinking that won’t need constant repair – we like one-and-done. Can you please advise?
Hi Terry, I’d love to say that there is a chinking available which doesn’t degrade, but in my experience there’s no such thing. The best advice I can give is in the article. Thanks, David
Hello and thank you for your page. I have a log cabin that has large gaps and checks. I would like to fill it in with my own mix. A little confused about where to start. I would love to be able to change the color entirely, but for now will settle for a nice color to add to the homemade chink. How to add color?? – is it only by adding a colorful Portland cement mix that can be accomplished? Have any of you experimented with sand, Portland cement and fine Styrofoam pellets for flexibility? Is Portland cement the best to use in very cold temperatures? Last two winters have been extremely cold with windshields in the minus 30 for extended weeks and heavy wet snow falls. Add to that we have had a surge of wasps building nests on every part of my log house in every open crevasse. Is there an oil to rub on the logs exterior to deter these animals from attaching to the house?
Again, thank you for making this tutorial.
Hi Monica, colored chinking is available from many suppliers, granted that getting a more “fruity” color will require coloring your own – it’s not something we have tried. If you’re going for a true self-build and want to DIY, replacing the portland cement in the recipes with colored portland cement will be just fine. For the longest-lasting results, make sure that you are applying your chinking between temperatures of 45° and 75° F and that it remains dry and unfrozen until it is fully cured.
Typically high temperatures and direct sunlight are the biggest chinking killers, but if you’re concerned about it, just check regularly for cracks and failures. I’m sorry you’re having trouble with wasps, they can be a pain at times. These articles have good advice and may help with that. Good luck, David
https://www.wasps.net/
https://www.wasps.net/wasps/black-wasps/black-wasps-in-log-cabin.html
Dear David;
We live in the Andes mountains in South America about 8500 feet elevation (2,590 meters). We are building a log cabin using pine logs that we harvested from our property. We have limited materials here but I was wondering what you think would be the best chinking recipe. Some of the hardware stores here stock additives made by Sika.
I look forward to your assistance,
Thank you JAMES WILSON
Jwilson@adjustme.org
Hi James, thanks for your question. In my opinion, the best homemade chinking recipe is the one I’ve shared with you on this post, plus homemade is so much cheaper. Sika is definitely a good, reputable brand with products that perform well, just make sure you read and read again to do the job as best you can. Remember, chinking can always be replaced if it fails so, unless money is extremely tight, don’t worry too much. Good luck with your build, David.
Hi David,
I appreciate your website and informations the construction of a log cabin.
I am located in Québec, Canada and it’s kind of a harsh climate.
Does that would affect the life time of the chinking, I am talking home made one here? Would that mean more maintenance?
How often do you have to maintain chinking when it’s well done in your experience?
Thank you!
Hi Gabriel,
Homemade chinking often requires more maintenance than store-bought ones. I’d say as a very rough guide that you’ll need to maintain it annually. Check for cracks and splits and deal with them sooner rather than later, and that will save more maintenance work in the future.
Thanks,
David
Love your site especially the chinking recipes! Built by my great grandfather, my 80+ year old cabin in northern Michigan is showing signs of wear. With your help, it will last another 5 generations.
Thank you!!!
Hi Susan. Science develops, but good is still good! May it go well for you, David.
We recently bought a 40 year old log home. It seem to have been well maintained. However, there are areas that the joints need to be re-chinked. The gaps are typically 1/4”-1/2” wide between the logs. Does a backer rod still need to be used and what product should I use for resealing/re-chinking? Log Builder, Conceal, Log Jam, or Perma-Chink?
Hi, Steve. Yes, for cracks over 1/4″ it is recommended to install a backer rod – first of all, you will save money on the amount of chinking you have to apply, and second, it helps spread it evenly. When it comes to choosing your chinking, you’ll be fine with any of the tried and tested brands, or you can make some savings by making your own. Thanks, David.
We have a overlapping rough cedar home. It is similar to a horizontal board on board fence. Can you apply any of these chinking recipes between the top cedar planks or will it rot the cedar back board? Is there is a moisture barrier I can place on top of the back cedar board and then use the metal mesh to adhere the chinking to?
Hi, Mindy. I have sent you an email. Thanks, David.
My Parents have purchased a log cabin house. The chinking seems to be mortar but with Styrofoam in between. Have you ever seen this before?
Hi, Kara. There’s a good chance it was used as a foam backer rod, however, Styrofoam (expanded polystyrene) isn’t recommended as it causes blistering in the chinking. It may be extruded polystyrene though, which is denser than its expanded counterpart, in which case it is fine. David
We built a tool shed cabin with logs and used a wide variety of expanding foams to fill the cracks. ie some open cell and close cell 2 part polyurethane foams and some single part foams that come in kits and aerosol cans. Some of these foams were compatible with oil based stains and paints and all worked well with water based stains and preservatives. We used small 4 inch grinders and belt sanders and long wood saws to trim and shape the excess foam. I dont know why this has not caught on. Some of the foams are flexible and do a great job of sealing. What we found worked well was to have someone on the other side of the wall with various size tubes wrapped in fresh paper that are held to the openings and which are used as temporary backing while we apply the foam.
I have a log cabin built with round logs, bark still on. Should I remove the bark prior to rechinking?
Other question such as after removing bark what is process to prepare logs for rechinking? Initially Mortar chinking used and is in bad shape (most is failed and more than 1/7 with of the log). Cabin is 60 plus years old.
Thanks for any reply
Hi David,
In general, it is advisable to remove the bark prior to rechinking your log cabin. Bark can retain moisture and create an environment that promotes decay and insect activity. By removing the bark, you can ensure better adhesion and longevity of the chinking material.
Hi Dave, My husband was building a log cabin from logs taken off our farm. Two days after putting upi the last two wall loga he passed away. That was 5 years ago. My two daughters are helping me finish the cabin. We havce put on the roof , finished the porch and next weekend we will put in the windows and make the door.
My concern comes with the chinking , we will be mixing our own. I have read to put chicken wire and nails in the logs to hold the chinking in place. Is this necessary?
Thank you for any help offered.
God bless
First of all, I want to extend my condolences for the loss of your husband. It’s inspiring to hear that you and your daughters are continuing his legacy by finishing the log cabin together.
Regarding your concern about chinking, I understand your question about using chicken wire and nails to hold the chinking in place. However, I want to assure you that it is not necessary in most cases.
In modern log cabin construction, there are various types of chinking materials available that do not require the use of chicken wire and nails. These materials are designed to adhere to the logs and maintain their stability without additional support. I would recommend using one of these modern chinking products, as they offer convenience and ease of application.
If you are looking for guidance on chinking techniques, I encourage you to refer to this blog post on log cabin chinking. It provides detailed information and step-by-step instructions on how to apply chinking effectively.
Please feel free to reach out if you have any further questions or need additional assistance. Wishing you and your daughters all the best as you continue to work on completing the log cabin.
Take care and God bless.
Hi there. We’re interested in purchasing an 1800s log farm house in western PA and are starting from scratch in terms of knowledge of maintenance. I noticed some surface cracks, looked like settling cracks, in the chinking. I’m not sure when exactly the chinking was done, but I know the house was restored in the 1980s, so my guess is it was around then. Do the surface hairline cracks mean the chinking will need to be replaced soon? I can provide photos. Thanks in advance.